
Introduction:
Hello Everyone,
Components:
In today's article, we are going to use the following components

In the highlighted JSON, All Bold texts are written after {{result. are the schema name of a CRM field. While the texts are written before the : (colon) are like variables, used to hold the field's value.


Complete View of Power Automate:

Let's understand the code
This code does the following Tasks:
Page Load -


Create -
Following code, used to collect the information from Textbox Controls and Providing as Input Parameters to Power Automate in JSON format in order to create a record in Dynamics 365
//Get the record Guid as a Response from Power Automate
Update -
The following code used to Update the record in Dynamics 365 by providing the updated values as Input Parameters along with guid of the record to Power Automate in JSON format.
Delete -
The following code used to Delete the record from Dynamics 365 by providing the Guid of record as an Input Parameter to Power Automate in JSON format.
Refresh (Run Fetch XML on button click)-
Refresh the HTML table means, anytime we can refresh the table and can retrieve the updated data from Dynamics 365.
The code that we have written on-load of the page to retrieve the Lead data from Dynamics 365, can also be written on Refresh Button click as well so that we can the code on-demand as well.
So if you would have noticed that we are calling the Fetch XML as per our need and on button click that was one of the major limitations of using Fetch XML inside Web Template.
Welcome to the Power Guide Mentorship Program.
Today, I am going to share a very useful TIP and Information regarding PowerApps Portal and Dynamics 365 Portal.
This article gives you the answers to the following questions:
- Can we perform CRUD operation from Portal, without using Entity Forms and Entity List?
- Can we design Editable Subgrid in Portal to Update the data directly in D365?
- Can we Pass Input/Output Parameters between Portal and Dynamics 365?
- Can we trigger Power Automate (replaced name of Microsoft Flow) directly from Portal?
I had these questions in my mind. However, I couldn't find any article on the internet which gives the answers to these questions. A lot of folks personally asked me about implementing these features in Dynamics 365 Portal. So, today at the end of this article, I promise you'll learn something really interesting...
Let us first discuss some complex business requirements of PowerApps Portal (Dynamics Portal).
Portal's Complex Business Requirement:
Requirement 1 - Display External System's Data on Portal -
Several times, we get a requirement from the client to display an external system's or application's data on the portal. To do that, in most situations we need to consume the APIs and Web Services to retrieve the data from the external system and need to bind it into a Custom HTML Table.
Requirement 2 - Create a record in Dynamics 365 without using Entity Forms -
I know this requirement gives a lot of pain to almost everyone who has worked with Portal in real-time projects. Because until now, there is no direct way available on Portal to Create the record without using Entity Forms.
Requirement 3 - Update the Dynamics 365 records without using Entity Form and Entity List - As of now the only way to update the existing records in Dynamics 365 is either Entity Form (to show the Entity Forms in Edit Mode) or Entity List, which allow you to update the record by either open the Entity Form in Edit Mode or open the record in a dialog to achieve the same.
Requirement 4 - Design a Custom HTML Table and Perform CRUD Operation -
Most of the time, we have to compromise with Portal design, due to not having any options to Create/Update and Delete the records in Dynamics 365 except Entity Forms and Entity List.
For retrieval, we do have OData Query and Fetch XML options available. However, for Create/Update/Delete we only have Entity Forms and Entity Lists features are there.
Requirement 5 - Create an Editable Subgrid -
I know, we have been using this feature in Dynamics 365 long back, however, we don't have such feature available in Portal. And we often end up pushing back such requirements, due to not having any custom way to perform CRUD operation from Portal.
Requirement 6 - Run Fetch XML On Demand and Change its execution order
We all know that Fetch XML is the best way available in Portal in order to pull the data from Dynamics 365. And, it is one of the most used features of Portal when it comes to the requirement where we have to design the portal page as per our need with Dynamics 365 data.
However, there are some limitations of Fetch XML:
- It can only run on Page Load.
- It cannot runs On-demand. Like on button click.
- Its sequence/order is always first on the page. Means, it always runs at the beginning of the page load. We cannot change it's running order. For Example: If I have to run the Fetch XML once my particular business logic is completed, then it is not possible.
Requirement 7 - Pass Portal Parameters to perform complex Business Logic in Dynamics 365 -
Sometimes, we need to pass some information from Portal to CRM in order to perform some complex logic in Dynamics 365.
For Example- If I have a requirement to provide Approval functionality on the portal, where a specific set of users can approve the requests directly from the portal, And, in CRM we need to perform some complex business logic as soon as request status gets changed to Approved based on the user who Approved the request from Portal.
In this requirement, we could use the Entity List Workflow Action configuration, which lets you allow to run an on-demand workflow directly on Entity List's records. However, it doesn't provide any options to pass some information/parameters to the workflow. Like in our requirement, we need to pass the logged-in user id/name to know who approved the request.
Hence, we cannot implement such requirements directly from Portal and we end up writing either Plugin or Custom code to achieve this.
I know, there are many talented folks and portal experts out there, who might have got the solutions or alternatives to the above requirements. But, until now, I didn't get any concrete answers or solutions on the internet to implement these requirements with minimal coding and customization.
But today, I thought of combined all these requirements in a single requirement and demonstrate the solution of it.
Scope:
In today's article, I am going to create a Custom HTML Table which will provide the following features:
In today's article, I am going to create a Custom HTML Table which will provide the following features:
- Retrieve the Dynamics 365 Entity's data and Bind it into the Custom HTML Table.
- Create, Update and Delete the record in Dynamics 365.
- Editable Grid Feature, to update the record directly in D365 (same like Dynamics 365)
- Pass Input/Output Parameters to Dynamics 365 using Power Automate.
- Run Fetch XML On-Demand (button click)
Components:
In today's article, we are going to use the following components
- Dynamics 365
- PowerApps Portal or Dynamics 365 Portal (of any type)
- Power Automate (Microsoft Flow)
- HTML/JavaScript/JQuery
Architecture:
The whole article revolves around these three components:
PowerApps Portal, Power Automate (Microsoft Flow) and Dynamics 365.
The whole article revolves around these three components:
PowerApps Portal, Power Automate (Microsoft Flow) and Dynamics 365.
- Portal Pass the information in the form of input parameters (JSON) to Dynamics 365 via Power Automate.
- Dynamics 365 pass the information in the form Output Parameters (JSON) to Power Apps Portal via Power Automate

Pre-Requisites:
- Dynamics 365 Instance
- PowerApps Portal or Dynamics 365 Portal (of any type)
- Power Automate (Microsoft Flow)
- HTML/JavaScript/JQuery Knowledge
Note: If you don't have the license of Dynamics 365 and Power Automate, you can test it on the D365 trial as well.
Implementation:
Step 1 - Create a Web Template and use it as WEB API
Through this step, we'll retrieve the data from Dynamics 365 Entity using Fetch XML and in a later stage will bind this data into a Custom HTML Table.
Through this step, we'll retrieve the data from Dynamics 365 Entity using Fetch XML and in a later stage will bind this data into a Custom HTML Table.
Step (a) Create a Web Template
Step (b) Create a Fetch XML from Advance Find (whatever data you want to display on the portal)
Step (c) Paste the Fetch XML in Web Template between fetchxml liquid tag
{% fetchxml my_query %}
// Paste your Fetch XML downloaded from Advanced Find
// Paste your Fetch XML downloaded from Advanced Find
{% endfetchxml %}
Step (d) Create a JSON structure of your fetch XML result as highlighted below:
{% fetchxml my_query %}
<fetch version="1.0" output-format="xml-platform" mapping="logical" distinct="false">
<entity name="lead">
<attribute name="subject" />
<attribute name="firstname" />
<attribute name="lastname" />
<attribute name="emailaddress1" />
<attribute name="mobilephone" />
<attribute name="leadid" />
<order attribute="fullname" descending="false" />
<filter type="and">
<condition attribute="createdon" operator="last-x-days" value="3" />
</filter>
</entity>
</fetch>
{% endfetchxml %}
{ "leads" :
[
{% for result in my_query.results.entities %}
{
"leadid":"{{result.leadid}}",
"subject" : "{{ result.subject }}",
"firstname" : "{{ result.firstname }}",
"lastname" : "{{ result.lastname }}",
"email" : "{{ result.emailaddress1 }}",
"phone" : "{{ result.mobilephone }}"
}
{% unless forloop.last %},{% endunless %}
{% endfor %}
]
}
In the highlighted JSON, All Bold texts are written after {{result. are the schema name of a CRM field. While the texts are written before the : (colon) are like variables, used to hold the field's value.
Step (e) Set the MIME TYPE to - application/json. So that the Fetch XML result will return in JSON format.

Step (f) Create a Webpage along with Page Template


Step (g) Create an Entity Permission for the entity that you are using to retrieve the data in your Fetch XML. I have used Lead, therefore I have created Entity Permission for Lead Entity.
Associate appropriate Web Role to the Entity Permission (as per your requirement). I have associated Authenticated User Web Roles in my example.

Step (h) Test the JSON
Open the Webpage (partial URL) in the browser, you should get the entity data in JSON format (as shown below:

Open the Webpage (partial URL) in the browser, you should get the entity data in JSON format (as shown below:

Step 2 - Create a Power Automate to communicate between Portal and Dynamics 365
Step (a) Create a Power Automate (Instant - From blank).
Step (b) Provide Name of the Flow and Choose When an HTTP request is received as Trigger Point

Step (c) Click on Use sample payload to generate the schema. Paste your sample JSON and Click on Done. Make sure there is no white space or syntax mistake in your sample JSON


My Sample JSON:
{ "lead" : [{ "Action":"Create", "RecordId":"123123", "Subject": "powerappsportal", "Firstname": "Arpit", "Lastname": "Shrivastava", "Email": "arpit@gmail.com"} ]}
In the above JSON,
Step (d) Add Next Step and Select Initialize Variable (rename it as per your need). And provide values as shown below. To set the value:


Step (e) Add Next Step and Select Initialize Variable (rename it as per your need). Provide a Name and set it's Type to String (as shown below). Keep its value blank as of now. We'll set it's value later.

Step (f) Add Next Step and Select Apply to each


Step (g) Add Next Step outside Apply to each and Choose Response Step to capture HTTP Request Request. We don't need to read the response in case of Update and Delete. However, in the case of Create we need to return the Guid of created record as a response. Hence, we are using this step to Create operation only.
Step (b) Provide Name of the Flow and Choose When an HTTP request is received as Trigger Point

Step (c) Click on Use sample payload to generate the schema. Paste your sample JSON and Click on Done. Make sure there is no white space or syntax mistake in your sample JSON


{ "lead" : [{ "Action":"Create", "RecordId":"123123", "Subject": "powerappsportal", "Firstname": "Arpit", "Lastname": "Shrivastava", "Email": "arpit@gmail.com"} ]}
In the above JSON,
- lead - is a kind of variable inside my JSON which holds the whole JSON string.
- Action - will hold the operation name like Create/Update/Delete, etc
- RecordId - will hold the guid of dynamics 365 records. We'll pass null value when we have to Create the record, while in case of Update and Delete, we need to pass the guid of the record
- Subject - hold subject of lead
- Firstname - hold first name of the lead
- Lastname - hold last name of the lead
- Email - hold email address of the lead
Note: You can design and structure your JSON and it's parameters (like lead, action, recordid, subject, etc) as per your business need. However, your JSON structure should remain the same to avoid any syntax error.
Step (d) Add Next Step and Select Initialize Variable (rename it as per your need). And provide values as shown below. To set the value:
- Click inside the Value input box, you'll see a small popup window next to it.
- Click on Expressions Tab inside the popup window.
- Paste - triggerOutputs()['headers']['origin'] inside Expressions and Click OK
Note: triggerOutputs()['headers']['origin'] - To read the origin value from HTTP request's header. Origin always holds the information of the source from where the request is initiated. In our case, the source should always be portal. hence the origin value would be 'https://<portalname>.powerappsportals.com'
See below:
 |
| Open any Power Automate instance From Run History and You'll see the origin in HTTP Request Headers |

- You will see the origin value set in your Value input box


Step (f) Add Next Step and Select Apply to each
- Click inside the box Select an output from the previous step, you'll see the same popup window next to the input box.
- Choose the name of your JSON. In my example, the name of JSON is lead. (As shown below) Hence, it's showing a lead in the popup window
{ "lead" : [{ "Action":"Create", "RecordId":"123123", "Subject": "powerappsportal", "Firstname": "Arpit", "Lastname": "Shrivastava", "Email": "arpit@gmail.com"} ]}

- We have to add the Conditions inside Apply to each as per the below diagram.

- So let's get started and Add first Condition Step inside Apply to each Step. And add the following 2 conditions to it.
- Action equal to 'Create' and
- Origin contains '<your portal URL> or <portal domain>'


- If Condition is True.
- Add Dynamics 365 Action and Choose to Create a record step

- Add one more step just below the Create a new record step and Choose Set Variable in order to set the variable (that we have initialized in Step (e)) value to Guid of the created record.
Expression: body('Create_a_new_record')['iteminternalid']
Note: iteminternalid is the key inside the JSON body of Create a new record step that holds the Guid of the newly created D365 record. In order to read this value we need to use the above expression.
 |
| Open any Power Automate instance From Run History and You'll see the iteminternalid in Create a new record step |

- If Condition is False
- Add one more Condition Step and again add following 2 conditions
- Action equal to 'Update'
- Origin contains '<your portal URL> or <domain>'
- If Condition is True (Request is for Update and originated from Portal)
- Add Dynamics 365 Action and Choose to Update a record step

- If Condition is False
- Add one more Condition Step and again add following 2 conditions
- Action equal to 'Delete'
- Origin contains '<your portal URL> or <portal domain>'
- If Condition is True (Request is for Delete and originated from Portal)
- Add Dynamics 365 Action and Choose to Delete a record step

- A complete view of all the Conditions inside Apply to each step:

Step (g) Add Next Step outside Apply to each and Choose Response Step to capture HTTP Request Request. We don't need to read the response in case of Update and Delete. However, in the case of Create we need to return the Guid of created record as a response. Hence, we are using this step to Create operation only.

Complete View of Power Automate:
 |
| Complete View |
 |
| Explanation of each Step |
Step 3 - Webpage to Design Custom HTML Table
In this step, we'll design a Custom HTML Table and Bind the data retrieved from Fetch XML (Step 1)
In this step, we'll design a Custom HTML Table and Bind the data retrieved from Fetch XML (Step 1)
Step (a) Create a new webpage as below

Step (b) Open the Localized Content record from the Webpage and Paste the code in Copy HTML Section (as shown below)
Download the complete code from GIT Hub

Step (b) Open the Localized Content record from the Webpage and Paste the code in Copy HTML Section (as shown below)
Download the complete code from GIT Hub

This code does the following Tasks:
Page Load -
- It requests the Webpage URL (as a WEB API) which is associated with Web Template.
- Retrieve the response in JSON format (as per the JSON structure defined in Step 1)
- Parse the JSON.
- Bind the JSON data in Custom HTML Table
- Provides Update/Delete/Refresh options in each row.
- Creates an HTML Form to Create the record in Dynamics 365.
- Overall we are providing CRUD operation through Custom HTML Table
Retrieval -
Code to call webpage (associated with web template) as WEB API to retrieve dynamics 365 data.
leadpage is the name of my webpage created in Step 1
I have used the following code on click of Refresh Icon, in order to refresh the table (if required) and get the updated data from Dynamics 365.
$(document).ready(function(){
$(".data-table").find($("tr")).slice(1).remove();
$.ajax({
cache: false,
type: 'GET',
url: '~/leadpage/',
dataType: 'json',
success: function (data) {
$.each(data, function (key, value)
{
var i;
for(i=0;i<value.length;i++){
//Write your logic to play with the data
}
});
}
});
});

Create -
Following code, used to collect the information from Textbox Controls and Providing as Input Parameters to Power Automate in JSON format in order to create a record in Dynamics 365
$("#saveBTN").click(function(){
//JSON structure
var leadRecord = '{ "lead" : ['+
'{ "Action":"Create", "RecordId":"null",
"Subject": "' + name +'", "Firstname": "' + firstname +'",
"Lastname": "' + lastname +'", "Email": "' + email +'"} ]}';
//HTTP Request to Power Automate URL
var req = new XMLHttpRequest();
var url = "<Paste the URL, you copied it from Power Automate HTTP Request Step>";
//Send https request to Power Automate
req.open("POST", url, true);
req.setRequestHeader('Content-Type', 'application/json');
req.send(leadRecord);
req.onreadystatechange = function() {
if(req.readyState == XMLHttpRequest.DONE) {
recordId = req.responseText;
alert("Record has been created...");
}
}
});
 |
| Fill the form and Save the Information |
 |
| The information has been Saved in Dynamics 365 and Showing in HTML Table |
Update -
The following code used to Update the record in Dynamics 365 by providing the updated values as Input Parameters along with guid of the record to Power Automate in JSON format.
$("body").on("click", ".btn-update", function(){
//JSOn Structure
var leadRecord = '{ "lead" : ['+
'{ "Action":"Update","RecordId":"'+recordId+'",
"Subject": "' + name +'", "Firstname": "' + firstname +'",
"Lastname": "' + lastname +'", "Email": "' + email +'"} ]}';
alert(leadRecord);
//HTTP Request to Power Automate URL
var req = new XMLHttpRequest();
var url = "<Paste the URL, you copied it from Power Automate HTTP Request Step>";;
//send https request to Power Automate
req.open("POST", url, true);
req.setRequestHeader('Content-Type', 'application/json');
req.send(leadRecord);
alert("Record has been Updated...");
});
 |
| Update the Lastname from 'Shrivastava' to 'Consultant' by Providing Editable Subgrid Feature |
 |
| The information has been updated successfully |
Delete -
The following code used to Delete the record from Dynamics 365 by providing the Guid of record as an Input Parameter to Power Automate in JSON format.
$("body").on("click", ".btn-delete", function(){
//JSON Structure
var leadRecord = '{ "lead" : ['+
'{ "Action":"Delete","RecordId":"'+recordId+'",
"Subject": "null", "Firstname": "null", "Lastname": "null", "Email": "null"} ]}';
//HTTP Request to Power Automate URL
var req = new XMLHttpRequest();
var url = "<Paste the URL, you copied it from Power Automate HTTP Request Step>";
//send https request to Power Automate
req.open("POST", url, true);
req.setRequestHeader('Content-Type', 'application/json');
req.send(leadRecord);
$(this).parents("tr").remove();
alert("Record has been Deleted");
});
 |
| Deleting the Record from the Table |
 |
| The record has been deleted successfully |
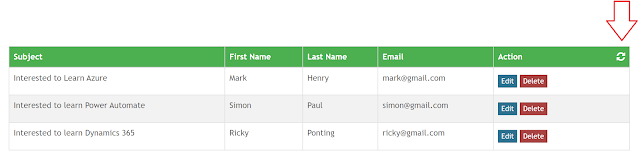
Refresh (Run Fetch XML on button click)-
Refresh the HTML table means, anytime we can refresh the table and can retrieve the updated data from Dynamics 365.
The code that we have written on-load of the page to retrieve the Lead data from Dynamics 365, can also be written on Refresh Button click as well so that we can the code on-demand as well.
So if you would have noticed that we are calling the Fetch XML as per our need and on button click that was one of the major limitations of using Fetch XML inside Web Template.
$("#refresh").click(function()
{
$(".data-table").find($("tr")).slice(1).remove();
$.ajax({
cache: false,
type: 'GET',
url: '~/leadpage/',
dataType: 'json',
success: function (data) {
$.each(data, function (key, value)
{
var i;
for(i=0;i<value.length;i++){
//Write your logic to play with the data
}
});
}
});
});

Download Complete Code:
You can find the complete code of the Custom HTML Table and Editable Subgrid from my GIT HUB Repository
You can find the complete code of the Custom HTML Table and Editable Subgrid from my GIT HUB Repository
Useful References:
https://colinvermander.com/2017/04/17/dynamics-365-portals-use-liquid-to-return-json-or-xml/
https://colinvermander.com/2017/04/17/dynamics-365-portals-use-liquid-to-return-json-or-xml/
Important Tips:
- Don't copy the code from the article for the actual project's use as it may have some white spaces and special characters. You might end up facing unnecessary syntax issues if you do so. I have provided code in this article for understanding purposes only. If you want to get the actual code. Please download it from GIT HUB (given the links above).
- For demonstration, I have used Lead Entity, declared/initialized various variables and Input/Output parameters. And refer the same throughout the code and in Power Automate. Please make sure to change the code/variables/parameters based on your requirements
That's all folks.
Stay Tuned for next interesting Tip - PowerGuideTip10
Git Hub repository is not accessible and throwing an error like 404 page not found.!
ReplyDeleteNot all the pictures are visible :( Is it also possible to make one button and update all the records listed in the list at once?
ReplyDeleteYour blogs further more each else volume is so entertaining further serviceable It appoints me befall retreat encore. I will instantly grab your rss feed to stay informed of any updates. convert $10
ReplyDeleteExcellent atricle. Really useful. thank you so much arpit. I appreciate you for your time and work.
ReplyDeleteAnyone looking for Salesforce app which save their time and can perform bulk CRUD operations in few click - their search end at Salesforce Appexchange app Bulk Object Field Creator
ReplyDeleteMost recommended and appreciable app by Salesforce MVP
Well Explained, Thanks!
ReplyDelete