Saturday, 11 April 2020

PowerApps - Display a loading icon until the screen loads completely


Hello Everyone,

First, I would like to personally thank everyone for providing such a great response to PowerGuide Program and keep your spirits up during this tough Covid time!

I wish you well during this challenging time. Stay at home. Be healthy and God bless you!

Keep Learning and Don't Let Your Learning Lockdown...

I am Starting today's Power Guide Mentorship Program with a Positive Thought:


TOUGH TIMES DON'T LAST

TOUGH PEOPLE DO


Today, I am going to share a #PowerGuideTip7 - Isn’t it a great idea to show a cool animated image until your canvas app screen is loading? Interesting Isn’t...!!!

So in today's program, I am going to share a tip to design a loading Icon or displaying a loading message until your Canvas App Loads the Controls and Data on the screen.

Of Course, it will improve your app's user experience as well.

In PowerApps, we have two techniques to provide this feature:

Technique 1 - Out Of Box Loader

Out Of Box Canvas App, provide a property called LoadingSpinner and LoadingSpinnerColor.

LoadingSpinner property is used to displaying a Canvas App OOB Loader Image unless your screen finishes loading.

LoadingSpinner can be used in three ways:

  • LoadingSpinner.None- Setting it's a value to None means it won't show the Loading Image on the screen.


  • LoadingSpinner.Controls - Setting it's value to Controls means, it will show the Loading Spinner unless all the controls present on the screen gets loaded completely


  • LoadingSpinner.Data - Setting it's value to Data means, it will show the Loading Spinner unless all the data gets retrieved on the screen from the defined data source

LoadingSpinnerColor property is used to change the color of the loading image (as per your need).

Please see below, how can you find these two properties in Canvas App Screen:

Click on the Screen in your Canvas App and then You'll be able to see LoadingSpinner and LoadingSpinnerColor Property


By default, LoadingSpinner value is set to None, but you can change it either Data or Controls as per your need


Different ways to display the LoadingSpinner


Can change LoadingSpinner Color using LoadingSpinnerColor property

This is how OOB Loading Spinner Looks like


Technique 2 - Design Custom Loader

I always promote using OOB features as much as possible whether it is Microsoft Dynamics 365 or Power Platform, however, while using this feature, my experience was not satisfactory to be very honest. Maybe Microsft will come up with some new enhancements to make it more mature.

And it's not me only who is complaining about this feature, you can find a lot of people (see reference below) having trouble using it especially in case of data loading.

https://powerusers.microsoft.com/t5/Building-Power-Apps/Custom-Loading-Spinner/td-p/268416

https://powerusers.microsoft.com/t5/Building-Power-Apps/Screen-new-property-LoadingSpinner/m-p/110767

Also, you can't change the Spinner Loader Image and its other properties (except its color).

Hence, to get rid of this situation, making your own loader is the best way, so that you can handle its appearance and Hide/Show as per your need.

Let's get started...

Step 1: Download the Gif Loader from the Internet (whatever you like)

Can refer following articles for the same:


Step 2: Add some Controls in your Canvas Screen where you want to display the loader

a) Rectangle Icon - To cover the whole screen and provide a placeholder for a loader.
b) Label - Display Progress Message (For Ex: "Please wait, Thanks for your patience...")
c) Image - To display Gif Loader Image.


Note: You can also design the loader screen as per your need by adding more controls.


Step 3: Declare a Variable to manage Hide/Show of Loader and all the Controls created in Step 2. 

Set the Variable to all the Controls (on Visible Property)

In the screenshot below, I have set the Variable for Label Control only. However, you have to do the same for the Rectangle and Loading Image as well.


Note: After setting a Variable (DisplayLoader) name, you'll get an error on the controls. Please ignore it for the time being. It is because we didn't set its value yet anywhere on the screen.

Step 4: Set the Variable value to True when you want to display the Loader, else set the value to False when you want to Hide the Loader (can hide/show as per your need)

In the below example, I am creating a Lead in Dynamics 365. and I have used the following formula on Create Button Control (OnSelect Property).

I have Set the Variable value to True (to display loader) at the beginning of my code and Set the Variable value to False (to hide the loader) at the end of the code

// Display Loader
Set(DisplayLoader, true);

//patch the daa into D365
Patch(Leads, Defaults(Leads), { firstname: firstName_6.Text },{ lastname: lastName_5.Text },{emailaddress1: emailAddress_5.Text},{jobtitle: jobTitle_4.Text},{mobilephone: mobilephone_5.Text});

// Save Data Locally by adding above collection in Local Cache
Navigate(SuccessScreen,ScreenTransition.Fade);

//Once done with the operation. Hide the Loader
Set(DisplayLoader, false);


Step 6: Run and Test the App


So thumb rule of displaying this loader is:

Set the Variable Value to True at the beginning of your code

Set(DisplayLoader, true);

/////Logic 1

/////Logic 2

/////Run Power Automate 1

/////Run Power Automate 2

/////Run Power Automate 3

/////Run Power Automate.....n

/////Logic ...n

//Perform all the logic/create/update/delete/retrieve

Set(DisplayLoader, false);

Set the Variable value to False at the end of your code


Important Note: In the above example, I have used the loader while pushing the data/record in the database. However, If you want to display the loader on the load of the screen, you can use the same algorithm (as shown above) on OnVisible property of your Canvas App Screen.


That's all folks for today.

Stay Tuned for my Next Tip - PowerGuideTip8. 

Friday, 10 April 2020

PowerApps - Provide Offline Capability In Your Canvas App


Introduction:

Welcome back to everyone in the "Power Guide Mentorship Program"

Mobile users often need to be productive even when they have limited or no connectivity.

In today's program, I am gonna share a very interesting Tip about PowerApps that allows app users to access the canvas app in offline mode as well or in other words app users can perform various activities in the canvas app without being connected to the internet.

Do we have some Real-Time Examples to understand the use of canvas apps offline capabilities?

There are plenty of examples where mobile users need to perform various activities while being offline. One of the most common uses of this feature for Field Agent 

Field Agents (Bank's Relationship Manager, Service Agent, Delivery Guy, Sales Agents, etc) often need to visit at Customer location for various purposes. And one of the major challenges is to stay connected with the Internet all the time especially when they have to travel in remote areas.

Hence, they can't rely on Internet connectivity to get their job done.

How PowerApps Support Offline Capabilities?

PowerApps has two impressive Features called SaveData and LoadData. SaveData is used to store the data locally in your mobile device and LoadData is used to Load the Data from your mobile device when the app user is online and get it synced to the actual database,

What is SaveData and LoadData?

Here are a few points to knows about SaveData and LoadData feature of the Canvas App.
  • SaveData function stores a collection (or table) for later use in mobile device's local memory.
  • The LoadData function reloads a collection by name that was previously saved with SaveData. You can't use this function to load a collection from another source.
  • You can use these functions to improve your app-startup performance as well by:
    • Caching Data in the App.OnStart formula on a first run. (using SaveData)
    • Reloading the local cache on the next runs. (using LoadData)
  • You can also use these functions to add simple offline capabilities to your app.
  • You can't use these functions inside a browser when:
    • Authoring the app in Power Apps Studio.
    • Running the app in the web player.

Syntax of SaveData and Load Data Functions

SaveData( Collection, Name )

LoadData( Collection, Name [, IgnoreNonexistentFile ])

Here,

Collection - Required. Collection to be stored or loaded.

Name - Required. Name of the storage. The name must be the same to save and load the same set of data. The namespace isn't shared with other apps or users.

IgnoreNonexistentFile - Optional. A Boolean value indicating what to do if the file doesn't already exist. Use false (default) to return an error and true to suppress the error.

Give me an example of SaveData and LoadData syntaxes?


Understand it from Dynamics 365 Perspective.

Let's discuss one Business Scenario:

Unlock the marketplace opportunity with the Cloud Enablement Desk ...

James is a Relationship Manager of ABC Bank, who often attends various seminars/workshops/training/meetings across the globe and meets various prospects. In one of his workshops, he meets Mr. David and David shows interest to know about Car Loans and various Car Insurance Policies.

James, quickly open his mobile, open the canvas app and create a Lead so that the sales team could follow up with David and take the conversation further and leave no stone unturned to convert that Lead into Opportunity.

Unfortunately, while capturing the Lead information James got to know that he is having some trouble connecting with the internet, however, thanks to the PowerApps SaveData feature, James can still capture the information and capture it locally in his mobile device and can sync it later once he comes back online.

How Cool it is !!

I think we have been discussed too much theory to understand this feature, Now, Let's see everything in reality...

I am going to create a Canvas App. At a high level, the app performs these tasks:

When the user opens the app to capture the lead:

If the device is online, the app first checks whether any local cache data is available to be synced with the data source.

If the local cache is available, the user will perform his/her desired activities like Creation of Lead in Dynamics 365.

If the local cache is not available, it either synced automatically in an actual source or ask the user's confirmation before getting it synced to the data source. (depends on the requirement/design)

If the device is offline, the app stores the Lead locally in Mobile Device.


Let's get started...

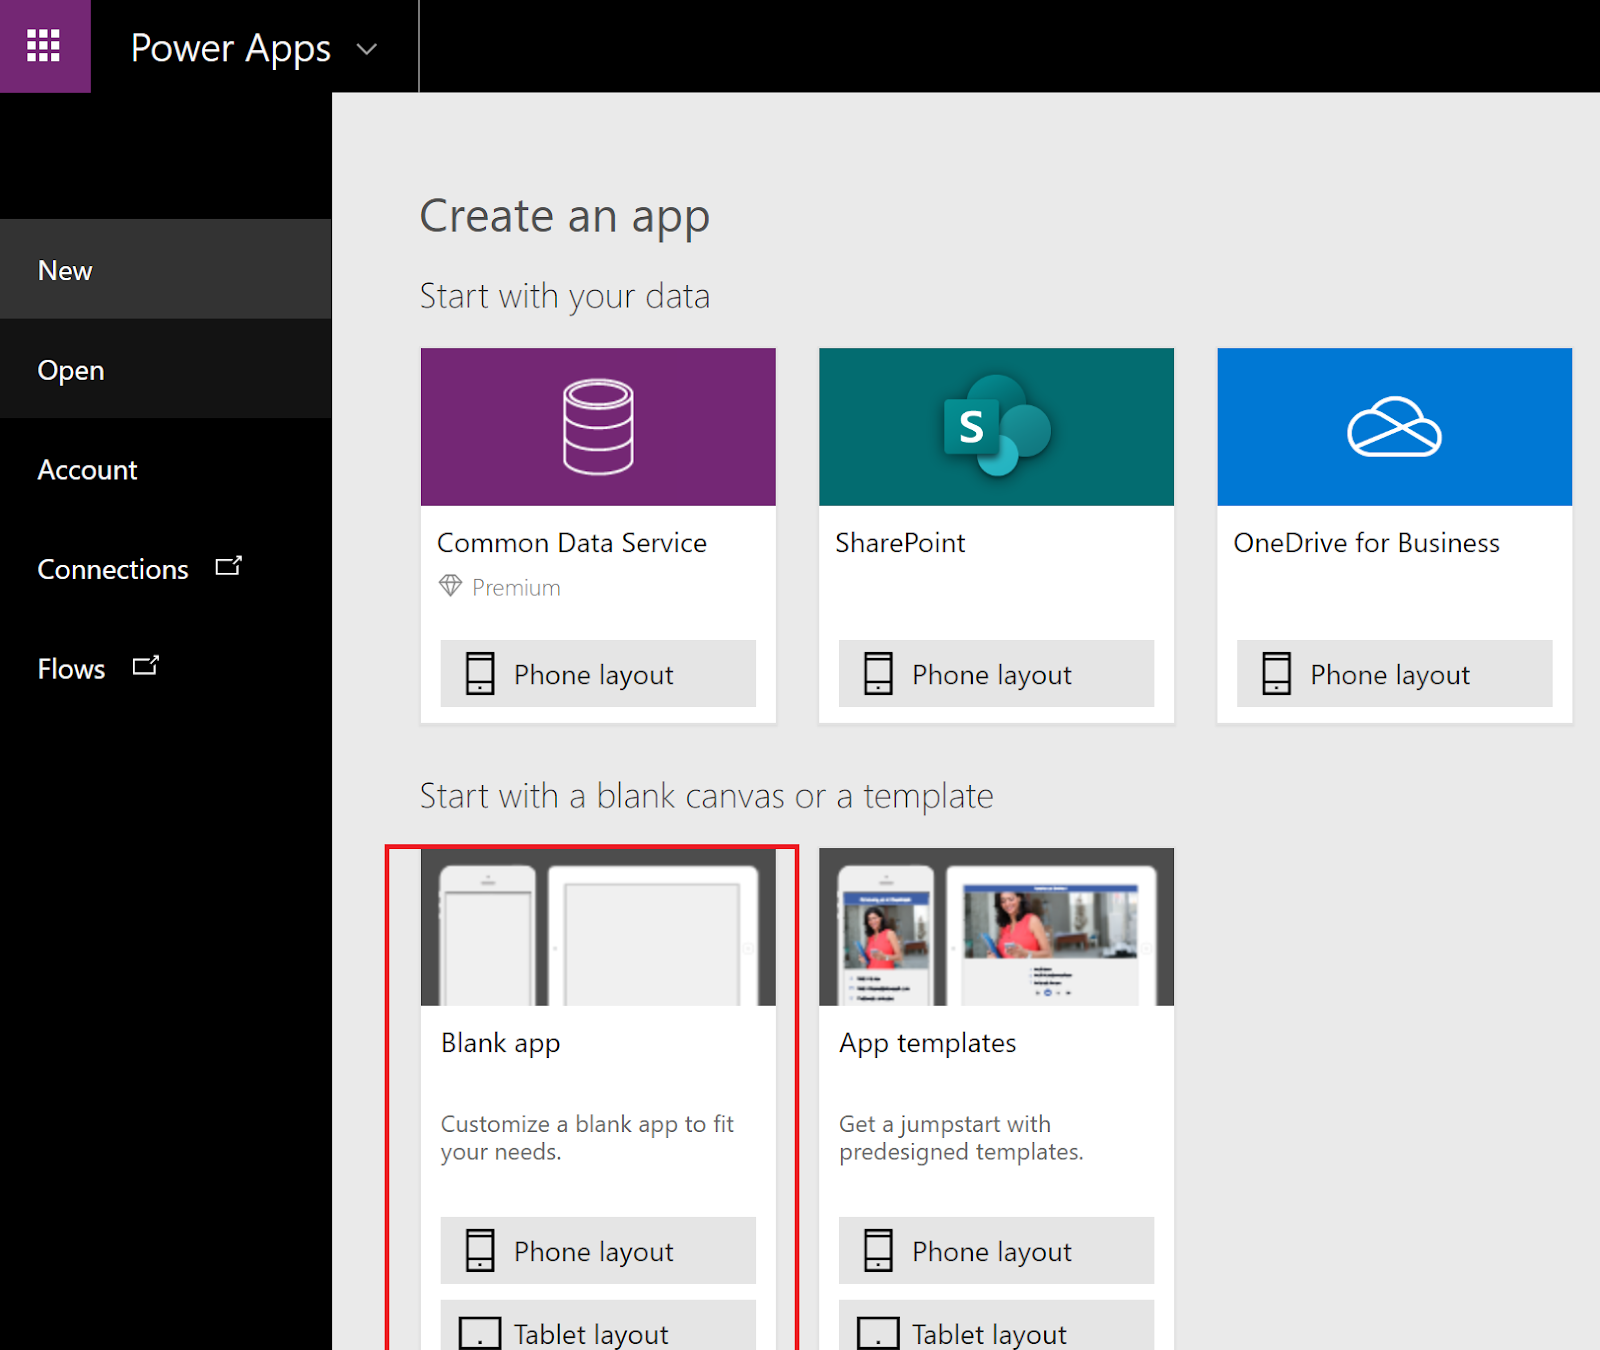
Step 1: Create a Blank Canvas App > Connect to Dynamics 365 as Data Source > Connect to Lead Entity (Ignore this step, if you already have a canvas app ready)


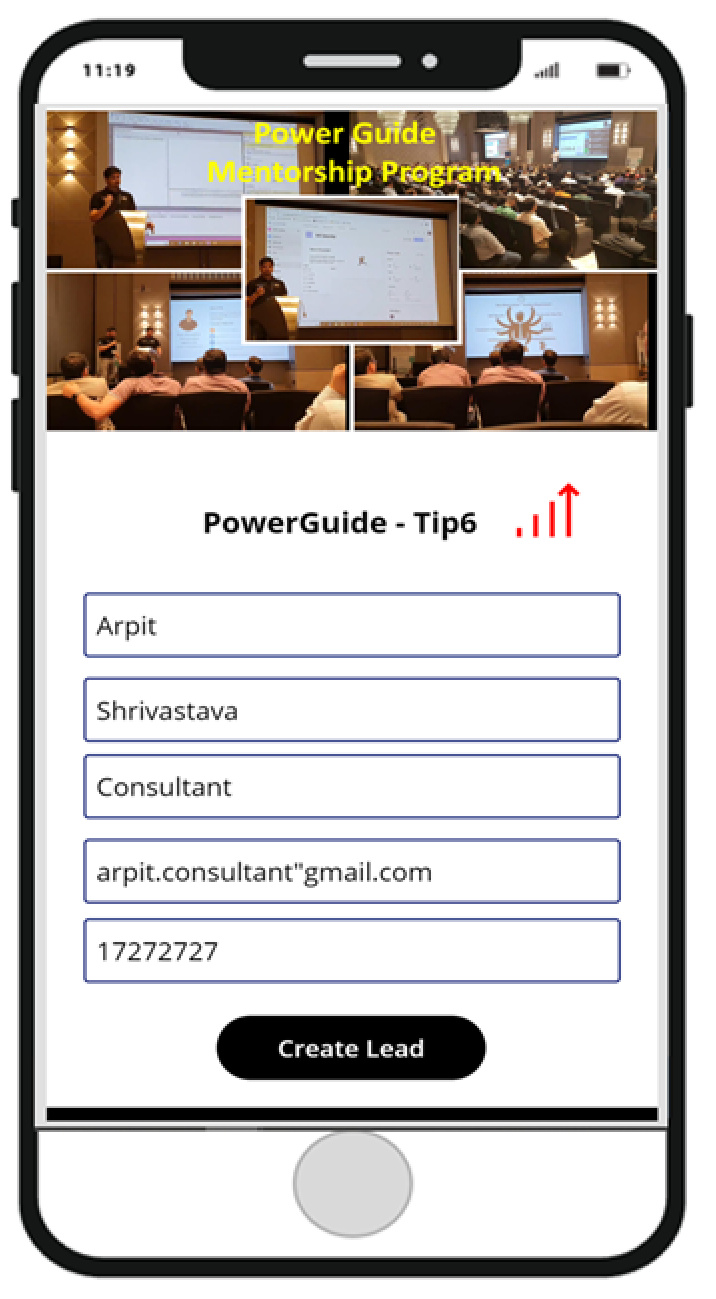
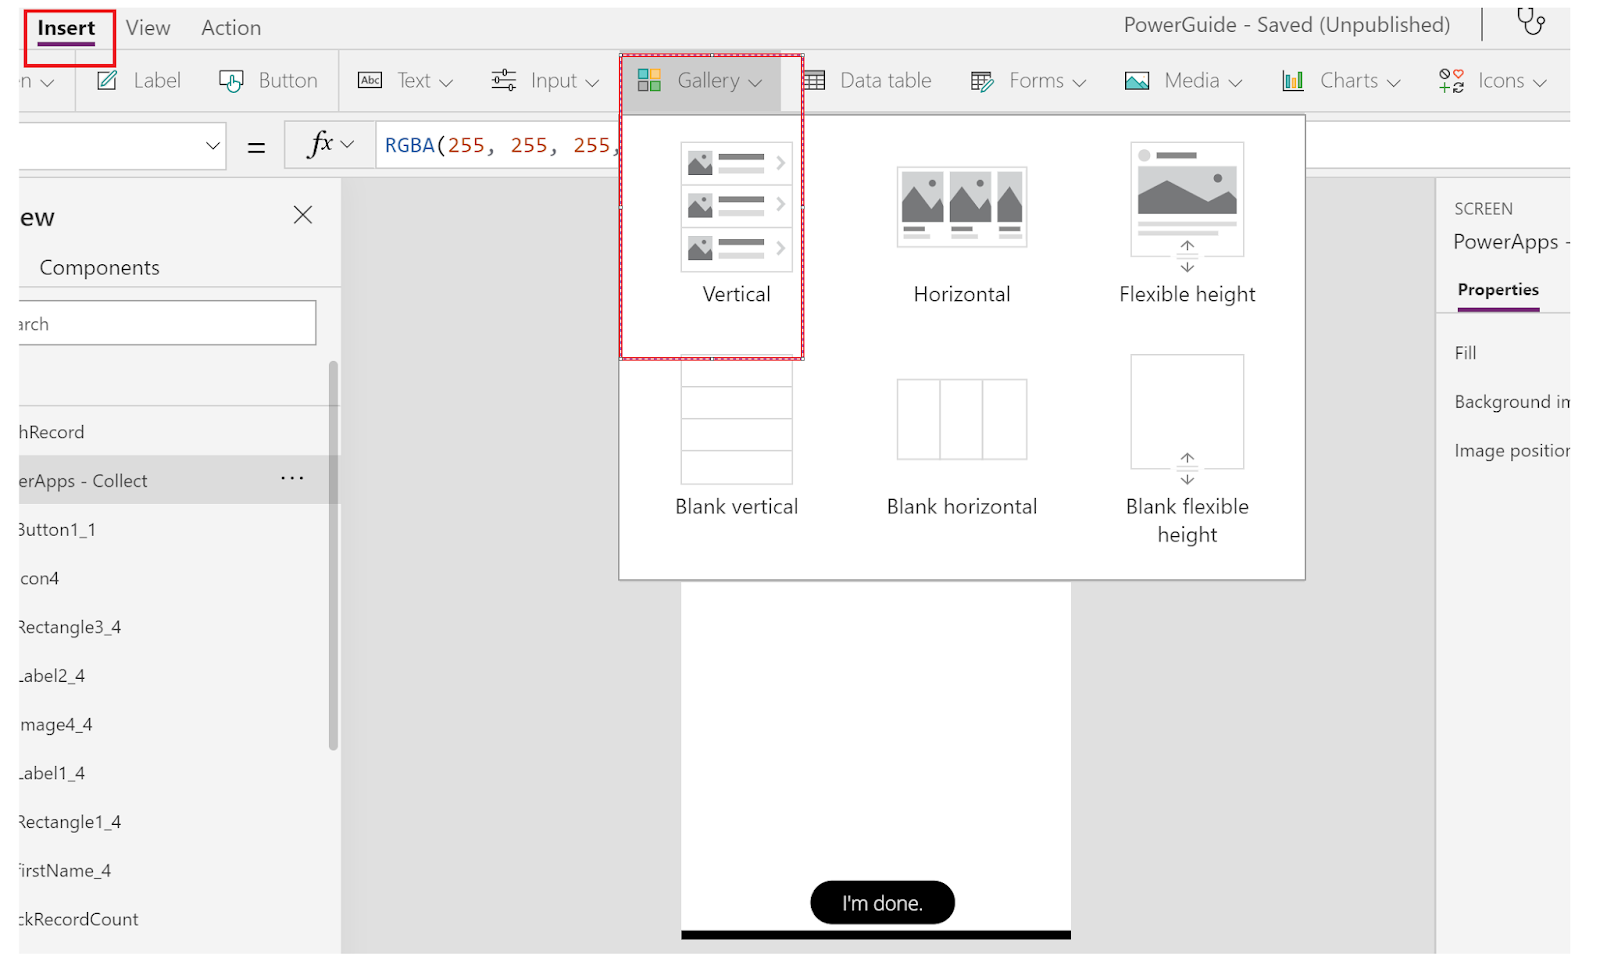
Step 2: Insert a Blank Screen and Add a few controls like Textbox and button (as per your need) in order to capture Lead's information and push them into Dynamics 365.


Step 3: Determine whether your canvas app is online or offline

Canvas App has Connection property through which you can check whether you are Online or Offline. But in order to notify it to the app user, It's up to you, how you wanna display this on the app screen. Here are several ways you can use to display app connectivity status to app users.

  • Add a label to display the information.
  • Add Circle Icon and fill it with Green or Red color to display whether the user is Online or Offline.
  • Add Signal Icon and Fill it with Green or Red color to display whether the user is Online or Offline. (As shown below)


Step 4: SaveData 

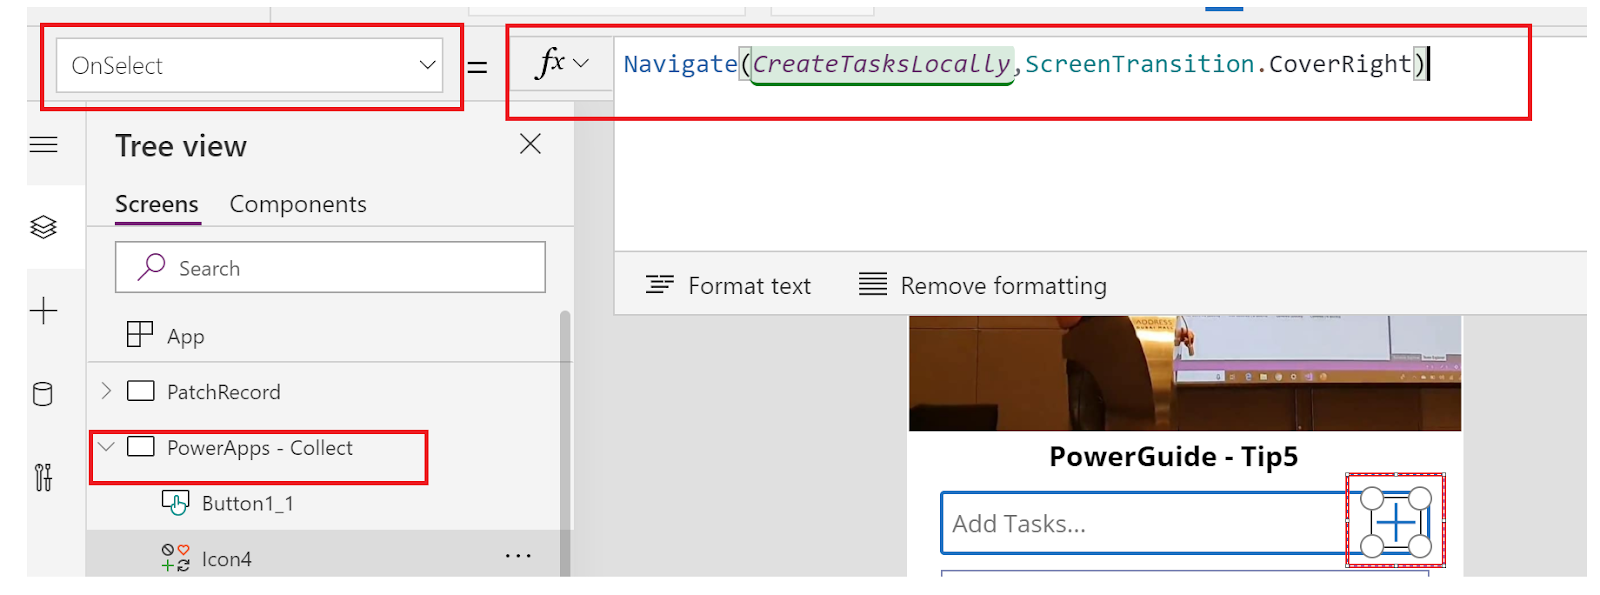
Add Code on Button Control (OnSelect) property to store Lead Information.

If Connected to the Internet -  Push it directly to Dynamics 365
If not - Save it Locally in Mobile Device using the SaveData function.


Step 5: LoadData

Now, when the user gets back Online, In order to load the saved data in the actual data source (in our example it is D365). There are two ways to do that:

Manual Sync- In this approach, you can notify the user that you have some unsynced items available in your device, Do you want to sync it actual system now? If the user confirms then only system sync the data to the actual data source else not.

Step (a): Add the following Controls to display the notification message. (as shown below)

- Rectangle (To show the Notification Dialog)
- 2 Buttons (Sync Now and Sync Later)
- Labels (To display message)


Step (b): Add following formula on Sync Now button (OnSelect Property)

// Retrieve all the Leads from Local Cache and Patch it in Dynamics
If(Connection.Connected,ForAll(LocalLeads,Patch(Leads, Defaults(Leads), { firstname: firstname },{ lastname: lastname },{emailaddress1: emailaddress1},{jobtitle: jobtitle},{mobilephone: mobilephone})));

// After Successful Patching, Clear the Local Cache
Clear(LocalLeads); 

// Display the Notification Dialog
Set(showsynicon, false); 


 Step (c): Add following formula on Sync Later button (OnSelect Property)

Set(showsynicon, false);

Means, Setting all Notification Dialog Control's Visibility to False in order to Hide it.


Step (d): Show Notification Dialog's Controls only when any Unsynced item is available, else Hide all Notification controls

We are managing the Hide and Show of Notification Dialogs Controls using Global Variable (showsynicon).

Means, we are setting its value to either False or True based on the data present in the local cache (see the next step for that) and then Set this Variable to Visible property of all Notification Dialog Controls (as mentioned in the pic)


Step (e):  Select App, and then set the following formula on its OnStart property:

If Local Cache has data then Set the showsynicon value to true else set it to false

In Simple, 

showsynicon  = true means Display the Notifical Dialog
showsynicon  = false means Not displaying the Notifical Dialog


//Load Local Data
LoadData(LocalLeads,"LocalLeads");

// If data is present in local cache then set 'showsynicon' variable value to true else false.
If(CountRows(LocalLeads) > 0,Set(showsynicon, true),Set(showsynicon, false))


Step (f): Test the Manual Sync App

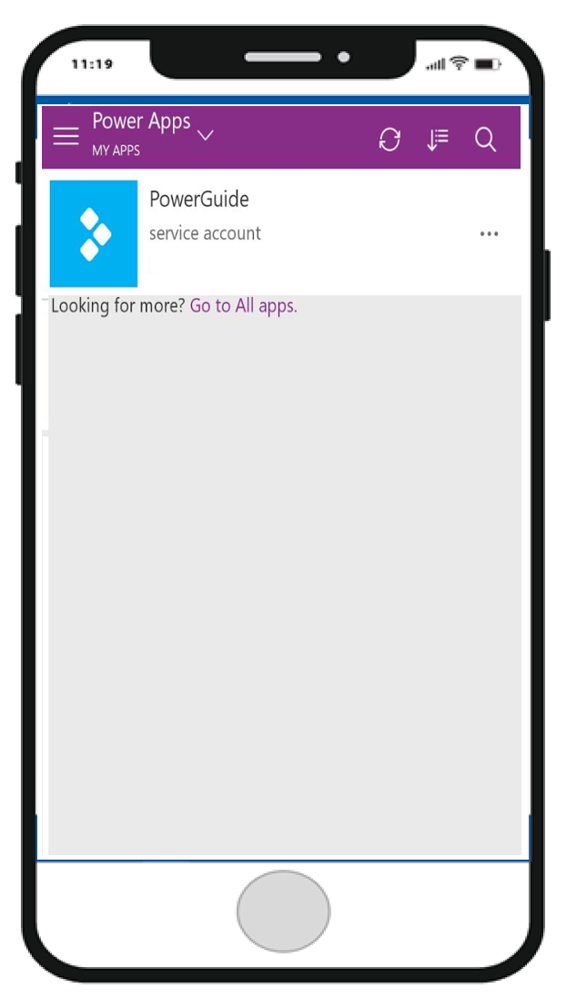
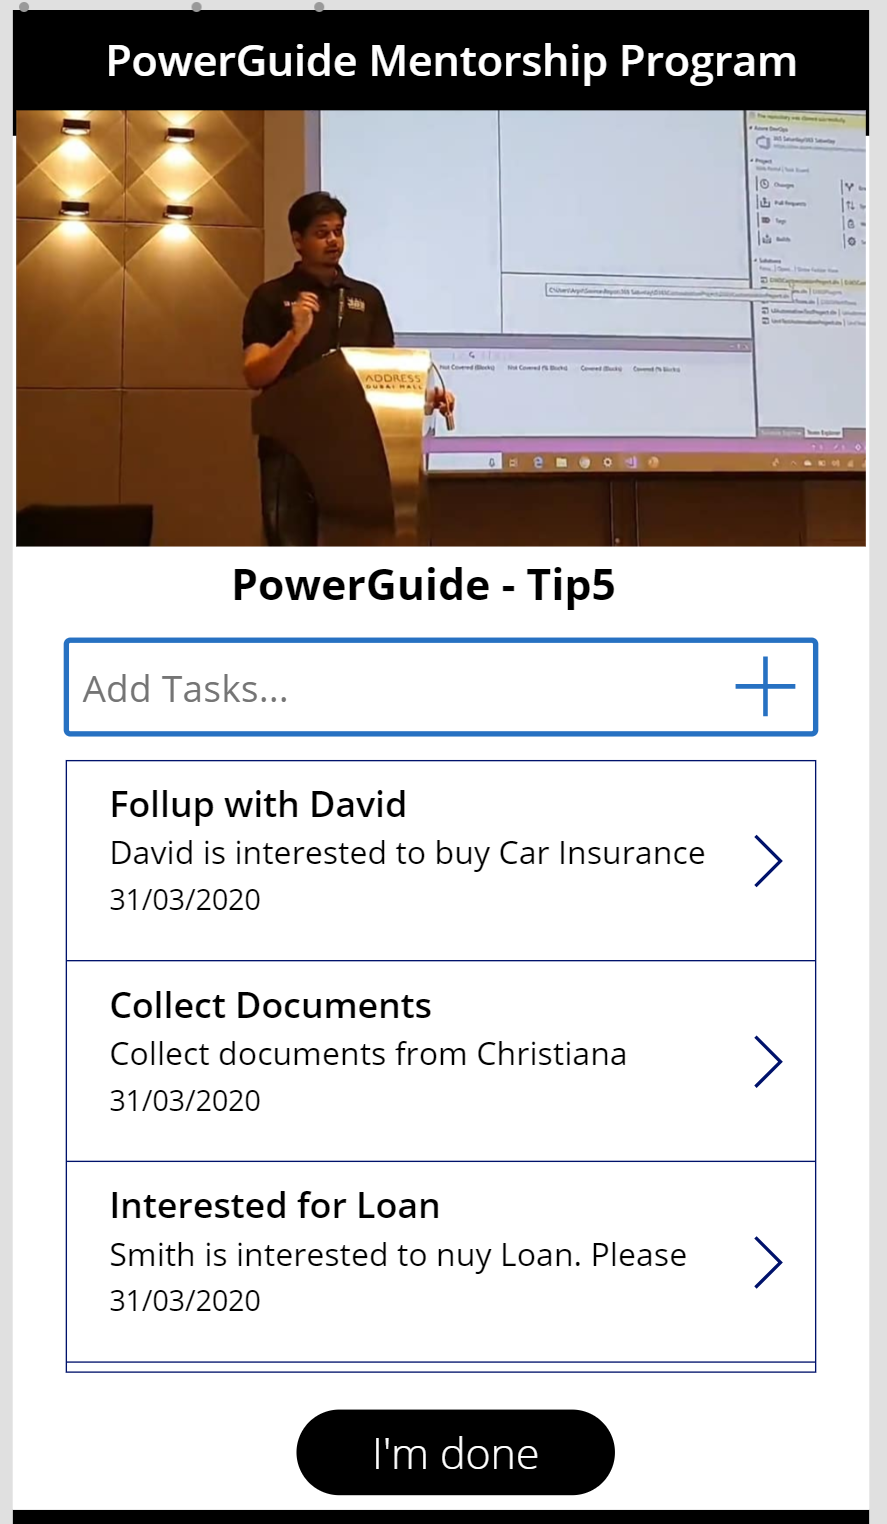
I am Online and Opening the PowerApp to create new Lead

App is being Opened

Green Signal Shows I am Online


As soon as I started creating Lead, I got disconnected from the Internet. Red Signals shows I am Offline

Closing my App, once done with my work

Reopening my App again when I am Online (Internet Connectivity is there)

Now, I see a Sync Notification appears on my screen

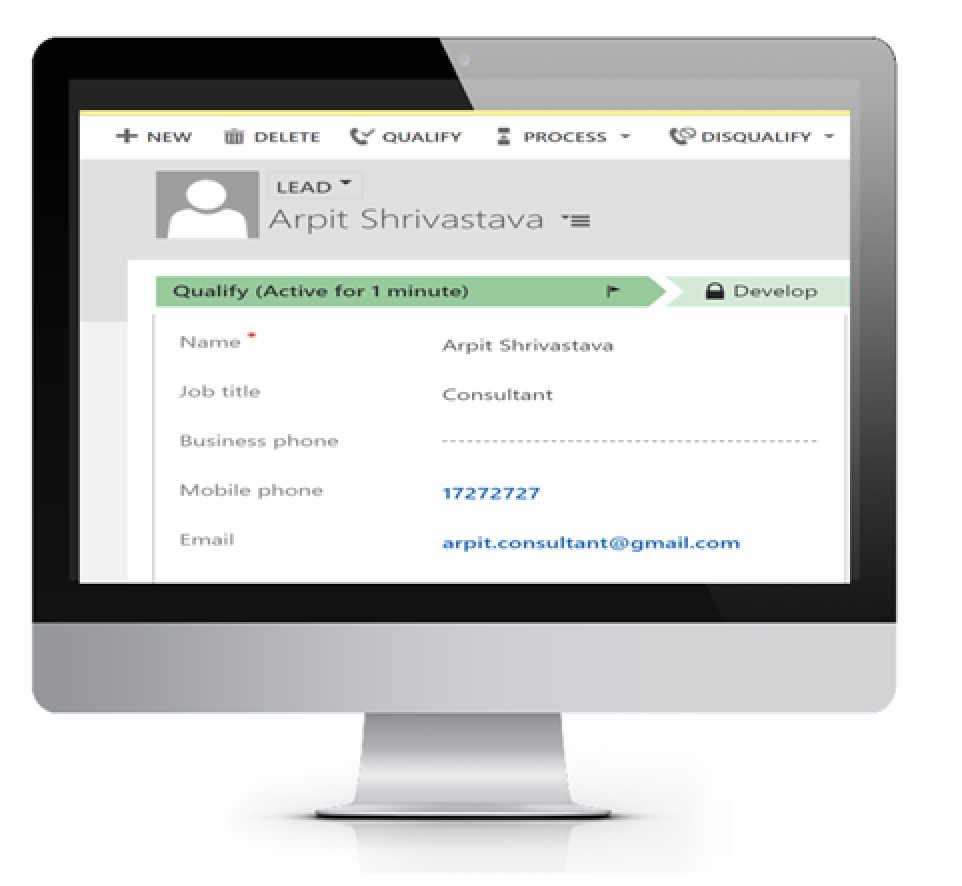
If I click on Sync Now option from the Notification Screen, Leads gets synced from my mobile local cache to Dynamics

I will get back to my Home Screen with Green Signals

Auto Sync- In this approach, there is no manual intervention needed. Once the user is Online, locally saved data gets synced automatically to the actual data source.

Important Note: If you want to sync the local cache data automatically. You don't need to follow the steps given in Manual Sync (Step (a) to Step (f)). For Auto Sync, we only to add formula on App OnStart Property (as shown below) and Create Lead Button OnSelect Property (Given in Step 4)

Step (a):  Select App, and then set the following formula on its OnStart property.

//Load Local Data
LoadData(LocalLeads,"LocalLeads");

// If data is present in local cache then, retrieve the data and patch it to Dynamics 365
If(Connection.Connected,ForAll(LocalLeads,Patch(Leads, Defaults(Leads), { firstname: firstname },{ lastname: lastname },{emailaddress1: emailaddress1},{jobtitle: jobtitle},{mobilephone: mobilephone})));

//Clear the local cache
Clear(LocalLeads); 


Step (b): Test the Auto Sync App


Open PowerApp

Open my App (PowerGuide)

It shows Green Signal Means I am Online

While Creating Lead, I got disconnected from the Internet (You can switch off your net). Red Signals indicates I am Offline


Closing the App, once my work is done

Open my app again, once I am connected to the internet

My Lead automatically got synced in Dynamics without any manual intervention


Is my canvas app data secured when I store it locally on my mobile device?

Of course, your data is fully secured. Storage is encrypted and data is stored in a private location on your mobile device. Also, It can't be accessible through other Apps available in your Mobile device.

Can some other App available on my Mobile device Load this data by using the LoadData function?

No, It is not possible to load data from other apps using LoadData() function. It's a powerapps feature only.

This feature seems to consume my Mobile Device Memory. How much amount of storage it consumes?

The memory that these functions consume can vary depending on the device, the operating system, the memory that Power Apps Mobile uses, and the complexity of the app in terms of screens and controls. If you store more than a few megabytes of data, test your app with expected scenarios on the devices on which you expect it to run. You'll generally have 30-70 megabytes of available memory.

Hence, it's a big No-No, if you are planning to store a huge amount of data locally in your Mobile devices. Otheriwse, you might end up getting Out Of Space issue

What are the Limitations of this SaveData and LoadData?

  • These functions don't automatically resolve merge conflicts when a device comes online.
  • Memory Capacity is between 30-70 MB, depending on the device, the operating system. So think twice before storing a huge amount of data otherwise You could end up getting Out of Space issue.
  • Debugging and Testing can only be possible in Mobile Devices not in PowerApps Studio or running the Canvas App in the web client. So you can understand, how tedious it was for me to explain this whole feature to you through screenshots. I did testing on my mobile, captured the screens from there and then put it here for you😀


I hope you like this Power Guide Tip.

In next #PowerGuide - Tip7 - I will share -  

How to show Loading Message/Progress Icon until your Canvas App finishes loading.

Stay Tuned...

Tuesday, 31 March 2020

PowerApps Collect Function - How to Improve your Canvas App Performance


Welcome back to everyone in the PowerGuide Mentorship Program. 

Today, I am gonna share a Tip - PowerGuideTip5 to improve Canvas App performance by using the Collect function.

Microsoft is already working hard to improve the performance of all apps that run on the Power Apps platform. But today, I am going to share one Tip that boosts the performance of apps that you create.


Let's get started...

What is Collect Function?


  • Collect is a kind of variable that is capable to store Collection of records/data in it.
  • Collect are sometimes used to hold global variables or make a temporary copy of a data source.
  • Collect can be used to store A Single Value, A Record and A Table.
  • Collect store the A Single Value, A Record and A Table in Canvas App local storage/cache.


When should I use Collect Function in my Canvas App?

There might be multiple scenarios where Collect Function might be helpful to use:

While Retrieving the Data from Data Source: Collect Function used to hold the temporary copy of your data source. By doing this, you can limit making the connection with the data source and also limit the number of queries you perform to retrieve the data from the data source.
This helps you to improve the Canvas App Performance.

While Pushing the Data to Data Source: Using Collect you can collect the data/record locally in your canvas app and then Push it into an actual database in one go, rather pushing it every time when you perform any operation from the Canvas App.


Can I clear the Collection after being created?

Collect values can also be cleared/removed depends upon the need. There are following ways to do that:

Clear - Clear function deletes all the records of a collection. The columns of the collection will remain as is.

Remove - Remove function is used to selectively remove the record from the Collections

RemoveIf- RemoveIf function to remove a record or records based on a condition or a set of conditions.

ClearCollect- ClearCollect function is the combination of Clear and Collect. It first Clears the Collection's data/records and then adds a new set of records to the same Collection


How can I read or retrieve all the Collection records?

ForAll - ForAll function used to read all the records available in a particular Table.


What is the Syntax of all these above functions?

Collect ( DataSource, Item, ... )

DataSource – Required. The data source that you want to add data to. If it does not already exist, a new collection is created.
Item(s) - Required. One or more records or tables to add to the data source.

Clear ( Collection )

Collection – Required. The collection that you want to clear.

Remove ( DataSource, Record1 [, Record2, ... ] [, All ] )

DataSource – Required. The data source that contains the record or records that you want to remove.
Record(s) – Required. The record or records to remove.
All – Optional. In a collection, the same record may appear more than once. You can add the All argument to remove all copies of the record.

RemoveIf ( DataSource, Condition [, ... ] )

DataSource – Required. The data source that contains the record or records that you want to remove.
Condition(s) – Required. A formula that evaluates to true for the record or records to remove. You can use column names from the DataSource in the formula. If you specify multiple conditions, all must evaluate to true for the record or records to be removed.

ClearCollect ( Collection, Item, ... )

Collection – Required. The collection that you want to clear and then add data to.
Item(s) - Required. One or more records or tables to add to the data source.

ForAll (Table, Formula)

Table - Required. Table to be acted upon.
Formula - Required. The formula to evaluate for all records of the Table.


Do we have some real-time examples to understand these all functions?

There are various real-time examples where we can use these functions.

Let me explain by taking an example of Field Service Agent, who uses a Mobile App (Canvas App) to handle his all sales/service activities and often visit at Customer Location based on his scheduled appointment.

During the customer visit, he might need to capture a lot of things while interacting with the customer.
Like:

  • Capture Notes/Discussions
  • Audio Recording of Meeting
  • Create multiple To-Do Tasks/Action Items
  • Assign the Task to the respective Sales Team in order to follow-up with the customer.
  • Click various Images/screenshots through Camera
  • Attach some supporting documents
  • Capture Customer Signatures and many more...

So while being in the meeting with the customer, a Field Service Agent has to do all these above activities.

Now, Just think about it, In order to perform these activities, every time I have to Push the data in the data source (Lets Suppose in our case it is Dynamics 365), then obviously it will impact the App performance. Because every time while performing the operation in Data Source (Dynamics 365), your app needs to make the Connection with D365, Perform the desired operations in D365 and return the result to the mobile app in order to display the actual result.

This is surely not the best solution from the architecture and user experience perspective.

In this type of requirement, the Collect function comes into the picture, where we can perform all these activities locally in your app and can hold the data/record in a temporary database. Once done with your work/appointment, you can push everything in the actual data source in one go.

Let's Implement this Canvas App and Learn how to each of these functions work in Real-Time:


Example of Collect:

Step 1: Create a Blank Canvas App with Blank Screen (ignore if you already have)  Connect it with Dynamics 365 Data Source > Connect with Task Entity


Step 2: Design the Screen1 by adding few controls as shown below (or design as per your requirement). Also add Vertical List Gallery to display Created Task's List.


Step 3: Add one more Screen2 in order to Create Task.


Step 4: Add Collect Function on onSelect property of Create button


Step 5: Set the Collection as a Data Source to Task Gallery in Screen 1


Step 6: Run the App and See the Output


Example of ClearCollect:

Step 1 to 3 will remain the same.

Step 4: Add ClearCollect Function on onSelect property of Create button


Step 5: Run the App and See the Output


Example of Removeif:

Step 1: Add Delete Icon in Your Task List Gallery


Step 2: Add RemoveIf function (as below) in order to delete the record base on the condition given.


Step 3: Run the App and See the Output


Example of Remove:


Step 1: Add Delete Icon in Your Task List Gallery

Step 2: Add Remove function (as below) in order to delete the selected record


Step 3: Run the App and See the Output


Example of ForAll:

Step 1: Add ForAll function to read Collection (as below) in order to Patch all the records in Dynamics 365


Step 2: Run the App and See the Output


Where can I see my Collection in PowerApps?

Here is the way to see your all Collections in Tabular Format


What are the other options in Canvas Apps in order to get the refreshed/updated data from the actual data source?

In Canvas App, once you create the data in the data source (D365), you have four possible options in order to get the updated data from the database.


  • Go to View > Data Sources > Right Click on the Entity/Table > Hit Refresh

  • Manually Refresh by adding Refresh(<Entity Name>); function on either click of some custom button/icon.


  • Automatically Refresh the data by adding Refresh(<Entity Name>); function on onVisible property of your Canvas App Screen


  • What is the validity of the data being stored in the PowerApps Collection?

    Data will be available in your PowerApps Collection unless you close the App. If you don't want to loose the data and want to use it further when you open your app again....we have some more interesting features that help PowerApps to work in Offline mode as well. I'll share it in my next post.


    I hope you liked this Tip and will use in our implementation to improve your App performance.

    In my next Tip- PowerGuideTip6, I will share one more interesting feature related to the Collect function through which you can work with PowerApp in Offline mode as well,

    Cheers and Stay Tuned 👍
    Blogger Widgets